
In part two of Straddle Splits and a Straddle Pancake, I want to address some ways you can help yourself to increase both of these straddles by finding more anterior pelvic tilt-AKA more mobility in your hip joint. This will set you up to be folding in half from a safe and anatomically correct place.
Most people know static stretching. You get down on the floor and lean into a stretch. It’s easy, it’s familiar, but unfortunately it’s not the most affective form of stretching. I wrote a post several months ago about the many other ways to stretch. The article focused on front splits flexibility, but the post gives some quick definitions of the other types of stretching and examples. The bullet points at the top of the post are links to more in-depth definitions if you are looking for more info.
All forms of stretching have their applications and some are more affective at increasing your flexibility and keeping those flexibility gains than others. There are also other components to consider for increasing your flexibility, like staying hydrated, sleeping enough and eating dark leafy greens (they’re high in antioxidants) to name a few.
For this post, I will cover self-myofascial release using a foam roller, some mobility work and active flexibility.
Below are a few ways to use these modalities to help you increase your straddle split and your straddle pancake. They will also help you to hinge forward from you hip and not your low back.
The Pre-Test
Before we proceed, sit down and see where your straddle and your straddle pancake are. Make a note of this. Now perform these movements below. (Of course, before we do any kind of activity, we should warm up first-so do that please.)
Foam Rolling

Now that you’re warmed up, we’ll start with some targeted foam rolling. Grab a foam roller. If you don’t have one, I highly recommend getting one. Begin rolling your back muscles along your spine and your lats. (If you need some guidance check out our video)
For more detailed info on the Do’s and Don’ts of the specifics for foam rolling and more details for foam rolling your ‘Back and Lats with a foam roller’ see these previous posts.
After your back, move to your lower body with Glutes and all of your Legs. Specific muscles of focus are your TFL. As you can see the TFL connects to your Iliotibial (IT) Band. It is best to foam roll only your TFL and not the IT Band. If your IT band is tight, most likely your TFL is, too, so focusing on the muscles instead of the connective tissue of the IT Band will result in loosening both areas.
You want to focus on the TFL because you’ll need to activate and engage it to help widen your straddle. You’ll also activate it along with your quads to help tilt the pelvis forward and have you hinge at your hips forward into your straddle pancake, as mentioned in Part 1 of this post.

To foam roll your TFL, lie on the foam roller as shown in this photo. You’ll want to place the roller right under your hip bone on the front of your pelvis and roll a few inches up and down in the direction of the muscle. You could also try some frictioning of your TFL, where you move side to side, horizontal to the muscle or even just roll slowly side to side to target any knots or tension.
*Foam Rolling Note*

Here’s another view of rolling your TFL. On another note, I also want to say when foam rolling pass over the muscle 4-5 times and then move on or use a timer to roll for 20-30 seconds on each muscle. You don’t want to fall down a foam rolling rabbit hole. Too much foam rolling of an area is not good either. Extra attention to certain muscle areas might result in the muscles or fascia tightening up, which is not our goal with foam rolling.
Mobility
I found this video that has a great explanation of doing the adductor rock-backs mobility drills that you can do to create more mobility in your hip socket. Do 10 rock-backs on each side and 10 of the internal/external rotations on each side.
Active Flexibility
Do 2-3 sets of 10 of these 3 exercises.
- All 4’s 1/2 Straddle Leg Lifts: This looks very similar to the adductor rock-backs position from the mobility work earlier, but the bent leg isn’t that far out into a straddle. From all 4’s, bring one leg out to the 1/2 straddle position and then slide the leg a little further in that direction, this will bring the opposite knee slightly out from under the hip, but this ensures that your pelvis is now parallel to the floor. Readjust your hands a little in the direction of your 1/2 straddled leg and engage your abs. This exercise is just as much of a core workout as it is an outer butt workout. Press firmly into the floor with your hands and the foot of the bent leg. Keeping the abs engaged and squeeze your butt muscles to float the straddled leg up off the floor. It should only lift a few inches. Make sure you are not lifting that hip to the sky to lift your leg, that’s cheating… and you also kind of look like a dog peeing on a fire hydrant, so none of that! Do both legs. (Note: If a straight leg is too challenging when you begin, do this with a bent leg, still making sure that your hip doesn’t lift up. Then when you have build up the strength move to the straight leg variation.)
- Reptile Slides: I learned these at an amazing workshop of Dave Tilley’s. Lie on your belly, arms up making a diamond with your hands so you have somewhere to cradle your forehead. Engage your abs–you are trying to find your hollow position even face down. Next, squeeze one of your glutes and raise your leg out to the side and up towards your elbow. The leg will turn out as if you are a frog or in your straddle. Make sure your glute squeeze happens first and that your hip doesn’t lift up towards the ceiling, again, no peeing on a fire hydrant, we want to make sure that the glute is doing the work. You are aiming to raise the leg towards your elbow, having the leg barely grazing the floor, but if you’re dragging your leg along the floor at the moment that’s ok. As you get stronger you’ll be able to lift it higher. If you are having some trouble sliding/pulling the leg up and out to the side, grab a paper plate or a Glide and place it under the knee to help. Additionally, make sure you are not tilting your torso to the side trying to make your elbow closer to the knee. The purpose of this exercise is to activate the external rotators and glutes to make them stronger and thus relax the inner thigh muscles. So you want to really focus on squeezing the muscles on the outer hip socket area. Repeat on other side.
- Standing Needle leg lifts: I also learned these at that same Dave Tilley workshop. Come into a standing forward fold. Make sure your abs are engaged. Bend your knees to place hands flat on the floor-whether you need to bend your knees or not. Keep one leg bent-this leg must remain bent-as you place one leg slightly behind you, leg straight, ankle pointed and tops of toes on the floor. Squeeze the quad of the leg prepped behind you; this keeps the leg straight and this leg must remain straight. Just like the other exercises, squeeze your glute muscles to float the leg up towards the ceiling. Keep your hips square to the floor the whole time, meaning don’t let the hip of the leg you’re lifting open up to face out to the side. It doesn’t matter how high your leg lifts, it matters that the leg is being lifted with your butt muscles and the leg being lifted stays straight. Do both sides.
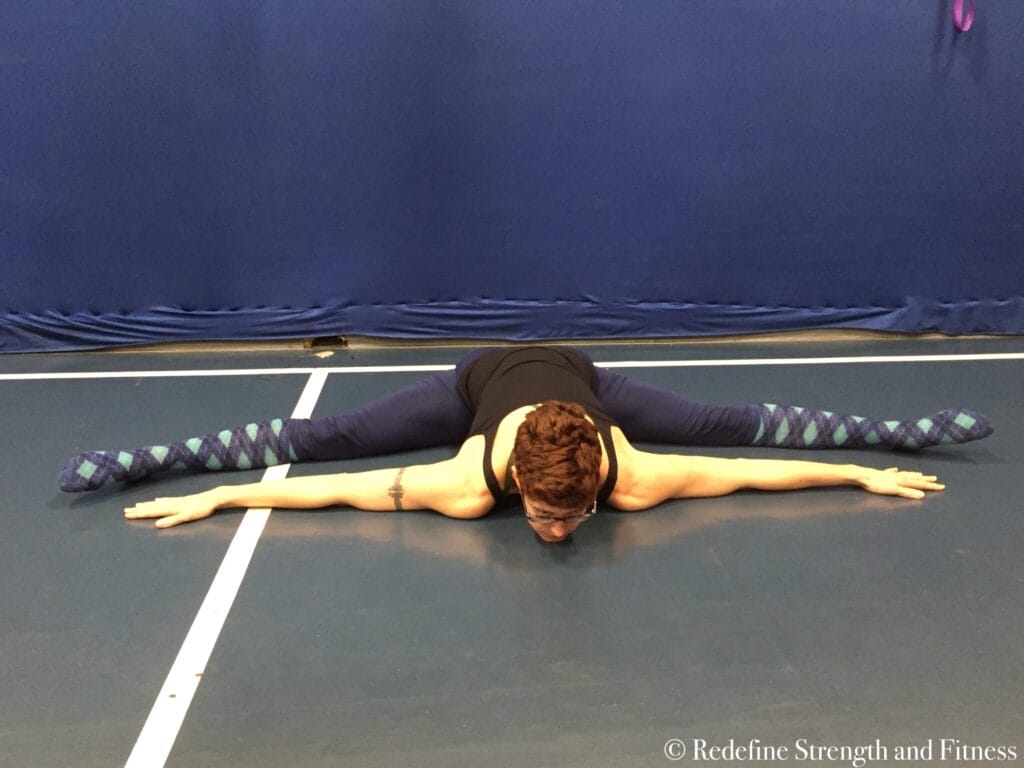
The After Test
Now that you have done all these movements, let’s recheck your straddle and straddle pancake. Let’s go through a checklist to widen your straddle and fold deeper forward into your pancake.
- Sit up tall on your sitz bones in your straddle. Do not have a rounded-under pelvis. Sit tall and have the weight on your sitz bones, even if that means you have to bend your legs some.
- Engage your abs and quads and keep them engaged. If legs are bent, try to squeeze the quads to work towards getting the legs straight.
- Have legs in neutral: knees and toes facing ceiling.
- Press your feet into the floor.
- Try to widen your legs further into a straddle by squeezing your outer butt muscles. Or it might feel like your trying to drag your feet along the floor away from each other. This is to activate your TFL. If this isn’t quite working for you, you can press your hands into your outer thighs, like your trying to push your legs closed while simultaneously trying to spread your legs into a wider straddle. (This can be done while folded forward too, you would just press on your lower thigh or calf muscles)
- Keep contracting the quads to keep legs straight and help your pelvis anteriorly tilt to keep the folding forward for the pancake hinging at your hip and not your low back.
- Contract your deep core/hip flexor muscles (Iliopsoas) to pull your tall posture towards the floor. The iliopsoas is a hip flexor and when you contract it, it will close the distance between your belly and thighs, or in the case of a straddle chest and floor. To focus on contracting iliopsoas think about trying to lift the legs up off the floor even as you hinge forward.
This all should feel like work if you are trying to get deeper in the positions.
Let me know if you feel like you are making progress with these tips from this post and from Part 1. Let me know if you have any questions. Leave them all in the comments. I hope these drills and exercises help you find flexibility gains in your straddle and straddle pancake!
Be Well ~~Theresa~~