
Last month I posted about warm-up exercises that are great for anyone and everyone to include in their pre-training/pre-workout warm-up. Below you will find some extra’s that are wonderful to also add to the mix.
But before I jump right into the Bonus Material, I’d like to restate some of the important points from the first blog post.
Why Warm-up
Warming up is more than just–it’s good for us to raise our heart rates before training, we also warm-up because we know it can help reduce the likelihood of injuries. Mitigating injuries is especially important since we know that injuries are quite closely related to proper joint function, or more accurately, to joint dysfunction.
The movements in our warm-ups are an opportunity…
- To prepare our muscles, etc. for the upcoming training session.
- To prepare our nervous system and prime the brain-muscle connection for the work to come.
- To prime our mobility and stability we already have.
- To address our body’s “weak links” by reducing tension in overactive muscles and activating underactive muscles.
- To develop/reinforce optimal joint function and functional movement patterns—essentially, to practice moving well (moving the right things while stabilizing the others) so that over time it becomes a habit.
Breathing While Performing the Exercises
In the descriptions below breathing will be cued. We want to inhale through our nose and exhale with a 5 second exhale out through the mouth as if you were breathing out through a straw.
The importance of good breathing patterns is numerous, but here are a few:
- There is a powerful link between a good breathing pattern and core activation.
- Good breathing will also encourage a “parasympathetic shift”—stimulating a decrease in unwanted muscle tension.
- Good breathing: think “below the ribs”; Bad breathing is just chest breathing during these warm-up exercises. Chest breathing isn’t always bad, but for the warm-up exercises, it is not what we’re looking for.
- On an inhalation, the diaphragm contracts (which is the top of the cylinder of the core-think of your core as a cylinder or a can).
- Deep abdominals assist towards the end of the exhalation phase.
- Pelvic floor involvement, which works in conjunction with the diaphragm and also part of your core musculature (the bottom of your cylinder/can).
- Good breathing makes good core activation happen automatically!
Bonus Warm-up Exercises
All-Fours Belly Breathing
Cues:
- From quadruped, hips over knees and shoulders over hands, bring hands a little ahead of your shoulders.
- Press the floor away with your hands and “dome” upper back as well as tuck your pelvis under–your shape will closely resemble cat pose.
- Inhale through the nose for 4 seconds.
- Exhale for 8 seconds—pushing the floor away more and using (contracting) your abs to assist in pushing out the last of your exhale.
- Perform 5-8 breath cycles.
Why we should include this in our warm-up
- Activates our serratus anterior muscles which are part of the process when raising our arms overhead.
- Core activation with your breath, especially on the inhale. Because on the inhale you don’t want to just relax your abs. You want to keep the core engaged and inhale against the tension of your core and inhale in a 360º manner.
- Creates a parasympathetic shift to help reduce tension. Since many of us experience stress in our daily lives and have muscles tension due to this stress (emotional or physical stress) that we tend to tap into our sympathetic nervous system more than we should. This breathing exercise helps to tap into the parasympathetic nervous system that helps chill us out on a physiological level.
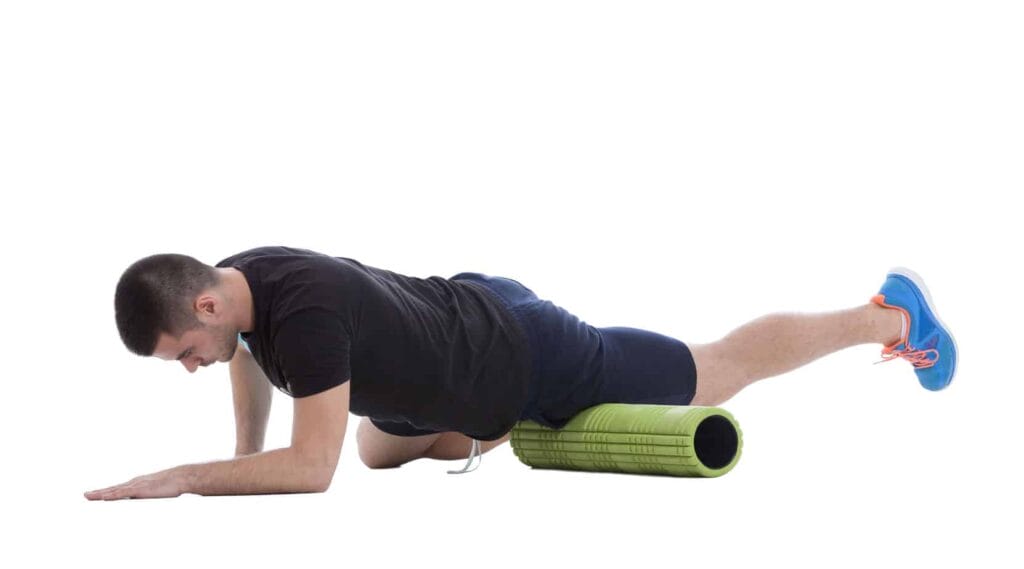
Foam Rolling—Upper back, lats, glutes, adductors, quads
Cues
- Move on the foam roller about 1 inch per second.
- Breath throughout the rolling process. If you are holding your breath or even wincing you are creating tension and not helping the process of trying to release tension. So breath and don’t press into the roller so hard you need to wince or make a face. Back off to a manageable pressure.
- Either perform 3-4 passes (up/down) on a muscle group or roll for about 30 seconds of each muscle group. You do not want to fall down the foam rolling void and emerge 30 minutes later. More or longer is not always better.
- For a more detailed explanation of foam rolling check out these previous blog posts I have written: here and here.
Why we should include this in our warm-up
- Reduces neurological tone (you’d describe ‘tone’ as tension). When we roll we are also rolling over our nerves. This is one of the reasons why rolling slowly and with some deep breathing is really important. It gives our brain time to receive the messages from the nerves and use the breath to help reduce the tone of the muscles. This article describes muscle tone nicely in both its actual definitions and its popular definition.
- Hydration of tissues-moving the water and other fluids around in your body to assist tissue renewal. So don’t forget to drink 8oz of water before you foam roll to help hydrate your tissue.
- Because of this hydration and reduction in neurological tone we see an improvement in tissue quality. You’d describe it as feeling less tight.
- It also gives us an opportunity to ‘check-in’ with our body to see where we might be feeling some muscle tension and think about what why this muscle tension is there. Could it be from sitting too long? A hard training session yesterday? An injury because you tripped and fell yesterday? Or those boots with the heels on them that you don’t normally wear?
Banded Walks—side-to-side and monster walks
Cues for side-to-side walks
- Place band just below the knees.
- Contract core
- Feet remain parallel to one another while stepping to the side. No turning out our turning them in.
- Maintain your crouch (or athletic stance) while stepping to the side. No leaning or shifting side to side. Imagine your shoulders and hips are a box and need to maintain 90º angles as your set to the side. I also describe this as image your a levitating penguin walking/floating sideways.
- Maintain tension in the band as you step to the side; step to the side and then a slow step with trail leg. The trail leg will never come all the way in to meet the first leg.
- Do 10 steps in each direction.
Cues for monster walks
- Place band either just above or below the knees.
- Contract core.
- Feet remain facing forward–make sure they do not turn out.
- Maintain your crouch (or athletic stance) while stepping back and in a diagonal pattern.
- Do 5 steps with each leg.
Why we should include this in our warm-up
- This activates your glute medius muscles for hip stability, knee happiness and better balance.
(don’t have circle bands, we like these ones)
Band-resisted Hip Flexion
Cues
(Typically, this warm-up exercise is hard, so choose an appropriate band)
- Place band around your feet and lay down.
- Bring knees up towards your chest and inhale through the nose.
- Exhale and extend one leg while actively maintaining hip flexion (knee to chest) of the other leg.
- Only extend and lower the leg as far as you can without changing your core/spinal positioning-no arching your low back or flaring your ribs.
- Extend the leg and hold for a 5 second hold, exhaling the whole time. Inhale return knee to chest and switch sides.
- Perform 5 reps with each leg.
Why we should include this in our warm-up
- This helps train dissociation of the hip joint (your hip socket) from the lumbopelvic complex: basically, hip flexion without lumbar flexion or pelvic tilting.
Hand/Wrist—CARs
Cues
- Movement is intended to come solely from the wrist joint without coupled movement from the forearm (i.e., no rotation of the forearm).
- Move slowly and deliberately through the rotation.
- Work towards moving through your biggest possible range of motion (ROM) (again, without moving anything else)
- Lead the movement with your palm—avoid ‘cupping’ your hand/moving your fingers
Why we should include this in our warm-up
- It’s great for your articular (joint) health.
- Maintains and might even improve your wrist ROM.
- Develop proprioception.
Quadruped Hip Extension from elbows
Cues
- Shift weight slightly onto one knee–try not to tip hips as you do this. (Placing your knee on a yoga block or a balance pad can make this exercise a bit easier).
- Engage core to keep a level pelvis and your spine from twisting.
- Exhale and drive bottom of your foot towards the ceiling to bring hip into extension.
- Make sure not to move your pelvis or spine–no arching of your low back and no flaring of your rib cage.
Why we should include this in our warm-up
- To learn how to extend our hip without flexing our lumbar spine.
- Bonus contralateral hip stability and spinal rotary stabilization!
Order of Operations
This is how I would add these exercises in with the other must-haves from the first post.
- All 4’s belly breathing
- Foam rolling
- T-spine rotation
- Quadruped hip extension from elbows
- Hand/wrist CARs
- Adductor rock-backs
- World’s greatest stretch
- Floor slides
- Leg lowers
- Banded hip flexion
- Cook hip lift
- Dead bugs
- Bear crawl
- Banded side-to-side and/or monster walks
- Wacky Jacks or Cross Jacks
As always, let me know if you have any questions or if you are looking for a more personalized warm-up for your particular needs and that addresses your body’s specific compensatory movement patterns. I offer online and in-person training and program design.
Happy warming up and training! Theresa and Mike
Pingback: Loosen up your shoulders and Improve your Range of Motion with These Three Exercises – Redefine Strength & Fitness